No doubt Microsoft Teams is one of the most powerful collaboration tools available today. With all it has to offer, the more you use it, the more cluttered it often becomes.
As we all know, unnecessary clutter can quickly become frustrating and distracting. We have some easy tips to help reduce your stress and increase your productivity. These tips will help you stay organized when using Microsoft Teams.
Staying Organized in Microsoft Teams Tip #1: Use Channels to Organize Your Discussions
Microsoft Teams offers a variety of ways for you to converse with your team members. This flexibility is both a blessing and a curse.
It gives you the freedom to choose the communication style that works best for you. But the flip side of that coin is things can get cluttered, making small details hard to find later. Especially if you only have one general channel or use organization wide teams.
Pro tip: Setting up Microsoft Teams channels is easiest when you haven’t yet created your team, or the team is brand-new. If your team’s disorganized, consider creating a new team and beginning with best practices from the start. Otherwise, use tip #5 to find relevant conversations.
When you first create a team, think about its purpose. Ask yourself, how you want the members to use it?
What types of projects will they use it for? What types of conversations do you plan to have? The answers to these questions will help you determine what the team structure should be.
Let the answers to these questions help you organize Teams channels. Use descriptive channel names. This helps members understand how and where you would like them to contribute.
Is your team already familiar with using tools like One Note, Planner, Yammer etc.? You can include those as tabs in your channel to create a richer collaboration space.
Once you have your team set up, create a new channel, or several to segment your team into smaller groups. Think of channels as a way to organize your team interactions by topic or project.
No magic number determines the correct channels to create for any team. But keeping your channel list streamlined and clear will help avoid communication confusion. Do you need a place where certain members of your team can focus on a specific workload. Consider using a private channel.
Staying Organized in Microsoft Teams Tip #2: Hide Teams You Don’t Use Often to Reduce Clutter and Distraction
This is an often overlooked, yet powerful feature to help you organize teams in Microsoft Teams. When you hide a team, it doesn’t mean that you’re leaving the team. It moves it to the “hidden teams” section at the bottom of your teams list.
If you only need to use a team occasionally and don’t need constant updates, it’s best to hide it. You still have complete access to all the team’s content.
Teams just won’t notify you about activity as often. If there is a team you need to access occasionally and don’t require constant updates, it is beneficial to hide it. This minimizes distractions.
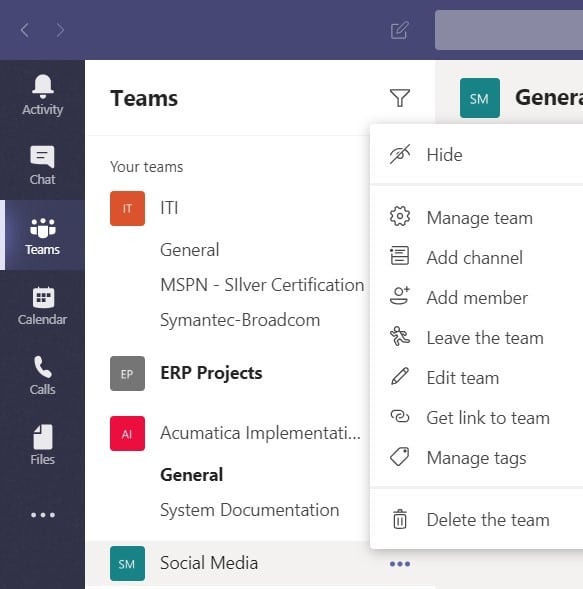
Hiding a team is simple. Go to your teams list, select the team or channel you would like to hide. Then click the ellipsis next to the team or channel name.
A drop-down menu will appear. The first option should be “Hide.” Click it.

Staying Organized in Microsoft Teams Tip #3: Reorganize Your Team List to Make Teams Easier to Find
Does the default ordering of your teams list make logical sense to you? If not, it’s easy to reorganize your teams in whatever way makes the lists easiest for you to navigate.
Perhaps you want to order them by how often you use a team, who it includes or something else. The choice is yours.
To reorder teams just click on the name of the team you want to move. Then, drag it to its new home. Once you have it where you want it, release your mouse button. Simple, right?
Staying Organized in Microsoft Teams Tip #4: Manage Notifications
To keep you up to date, Microsoft Teams offers a lot of different notifications. These are both visual and auditory to help you make sure that you never miss an important announcement or deadline.
But sometimes, these can become overwhelming. Especially if there are teams where you are more of a passive, rather than active member.
In case you don’t want your workday interrupted every time someone posts something new, comments, or adds a file. Microsoft Teams allows users to customize their notification settings.
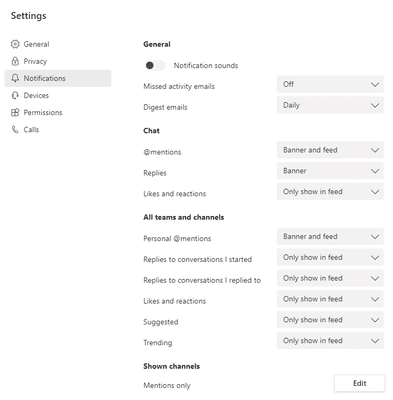
Want to see every notification setting? Click your picture or initials, found in the top right-hand corner of your Microsoft Teams screen. Then, click settings and select the notifications section. You should see a menu that looks something like the one shown below.

Please note: your options may look different depending on how your administrator has configured the system.
As you’ll notice, when you look at the menu, you will find your sound settings at the top. For most users, this will be one of the most important settings for you to adjust according to your work style.
There aren’t many things more distracting than having random sounds coming from your computer. Unlike other settings in Microsoft Teams, your sound settings are all or nothing. By this I mean they’re either on or off. You can’t specify certain instances in which you would like to hear a sound notification.
Right after the sound settings, you will see an option for digest emails. This are great for people new to Microsoft Teams or who don’t spend a lot of time in the app. Use these to have any important notifications sent to your inbox.
Below this, you can choose what type of notifications you’d like to receive. For each of these, you have three choices for the notification type.
For the actions most important to you, I recommend choosing the first option “Banner and Feed.” These notifications are like the messages that pop up at the top of your cell phone screen.
This is the most noticeable of the three options. So, if you get too many of them, they can quickly become annoying. But they’re useful for things you need to follow up on immediately.
The second option “Only in Feed” is mainly for conversations in teams or channels. When you select this option, you won’t get a banner on your desktop notifying you of recent activity. Instead, you’ll see the name of the team or channel written in bold text on the left-hand side of your Microsoft Teams app. This is a more discreet approach the program takes to inform you about any activity.
The third option “Off” works just as it sounds. Choose this if you do not want to know when a specific activity has occurred.
Staying Organized in Microsoft Teams Tip #5: Looking for Something Specific? Try Search.
Let’s face it. A lot happens in Microsoft Teams. Even if you followed all the best practices, you may still need help finding a specific conversation or file. In these situations, search is your best friend.
To find the most relevant items for a specific search, use the filter feature. these options will help you narrow down your results. Here’s how it works:
Go to the top of your Microsoft Teams application and type your search term in the search box.
Press enter on your keyboard
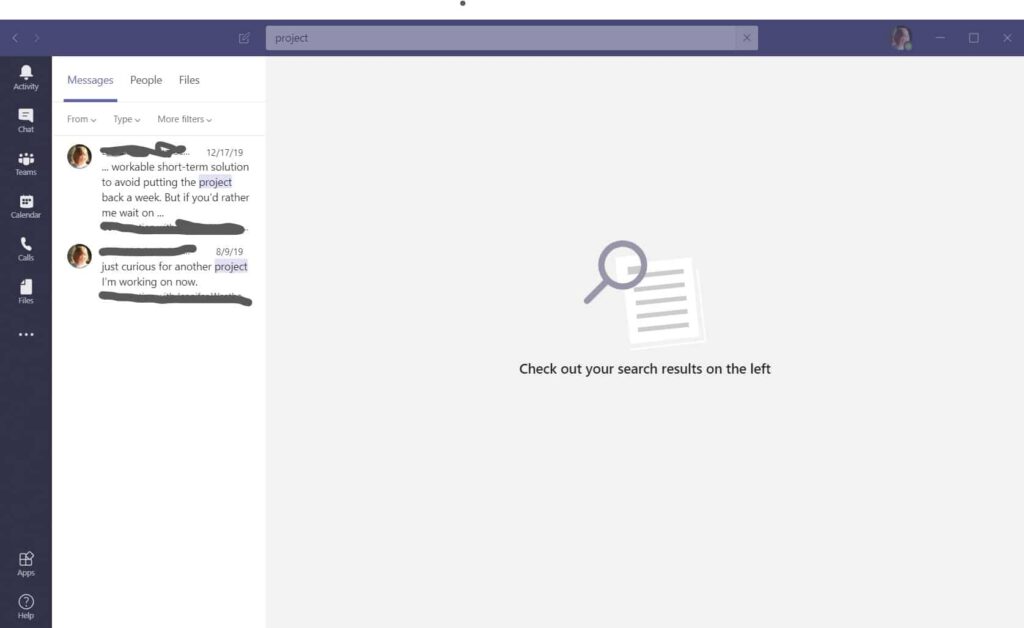
As you can see in the screenshot below, I searched for “project”. The pane on the left-hand side gives me my search results organized into categories, “Messages”, “People” and “Files”.
Under those major categories are some additional filtering options. You can choose who the content was from, what type of content you would like to find. Or you can set additional filters that will search by “Subject”, “Date Range”, “Team”, “Channel”, “My Mentions” or “Has Attachment.”

The search filters are highly granular. They give you complete control over your search. So, you can focus only on the most relevant results.
Little is more frustrating than searching through an entire haystack just to find a single needle. We’ve all been there…
We hope these tips for staying organized in Microsoft Teams help you take back some of your workday. If you’d like to learn even other best practices for Microsoft Teams organization, check out the articles below.
- https://techcommunity.microsoft.com/t5/healthcare-and-life-sciences/how-to-get-organized-and-stay-productive-with-microsoft-teams/ba-p/745792
- https://support.office.com/en-us/article/microsoft-teams-video-training-4f108e54-240b-4351-8084-b1089f0d21d7?ui=en-US&rs=en-US&ad=US
- https://microsoftteams.eventbuilder.com/event/21726
Did you like this post? Check out our library of other Microsoft 365 tips and tricks. Or leave us a comment to let us know which Microsoft Teams organization tip is your favorite.


