When events out of our control forced us to leave the office seemingly overnight, many of us had to begin using a collaboration app, like Microsoft Teams, Slack or Base Camp to replace a lot of the personal interactions we were used to getting in the office. And, at first, when you’re new to these systems, feeling your way around all their features, it can sometimes feel you’re not being as productive as you normally would. But don’t be too hard on yourself. Keep in mind, these collaboration apps, like other software have a learning curve and it’s okay to take the time to get to know them. Once you do, using them begins to seem much more natural.
To help you over the learning curve and ease some growing pains as you transition into a remote worker, I have six quick productivity enhancing Microsoft Teams features to share with you today. Each one should help you squeeze a little more time out of your workday.
Microsoft Teams Productivity Enhancing Features #1: The Command Line
Did you know that the search box at the top of your Microsoft Teams app can help you search for more than files or chats? You can also use it to navigate Microsoft Teams without taking your hands off the keyboard. All you must do is type a / and the list of commands will pop up. Developers call this the command line. But you don’t have to be a developer to take advantage of it. Once you enter the /, use the arrow keys to navigate this list or type the first couple letters of whatever it is you are trying to do and the most relevant options will appear.

Microsoft Teams Productivity Enhancing Features #2: Custom Tabs
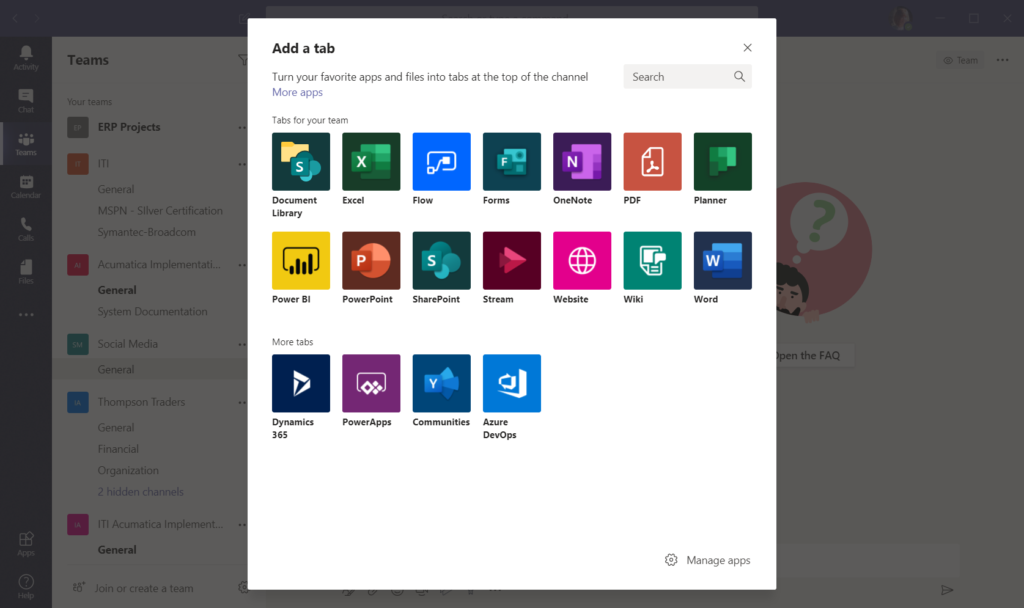
Custom tabs are a brilliant tool for organizing the files, tools and sites that you and your coworkers use every day. You no longer must waste time searching between tabs, collecting one piece here and another piece there. Creating a custom tab is easy. At the top of your Teams screen, right below the search bar, you will see the tabs. The default ones are “Chat”, “Files”, “Organization” and “Activity.” Next to “Activity” you will see a +. Click it. A new window like the one you see below will open allowing you to choose from a variety of options. Select the one that makes the most sense for you and follow the on-screen instructions.

Microsoft Teams Productivity Enhancing Features #3: Rename Group Chats
Chat is often one of the most popular features among Microsoft Teams users. They’re a handy way to have the virtual version of a hallway chat or impromptu meeting. Using chat, you can have private interactions with specific people, without involving the entire team. They can be one-on-one or include multiple people. Because this tool so frequently used, your chat feed (shown below) can quickly become cluttered, and it becomes hard to find the right conversation. One simple way to avoid this issue is to give each of your chats their own name. That way, you can see immediately who you were talking with or what the conversation was about. Not only does this make scanning your chat feed a much easier, it also helps to avoid the risk that you could accidentally share information with the wrong group.
To give your chats more descriptive names
Click the chat icon on the menu on the left-hand side of your screen. Choose the chat you want to rename from the list located just to the right of the menu. When that chat opens in the main pane of the Teams app, you should see a pencil icon next to the names of the chat participants. Click this and a pop-up window will open. Enter your desired name here and click Save.
Microsoft Teams Productivity Enhancing Features #4: Connect to Other Apps
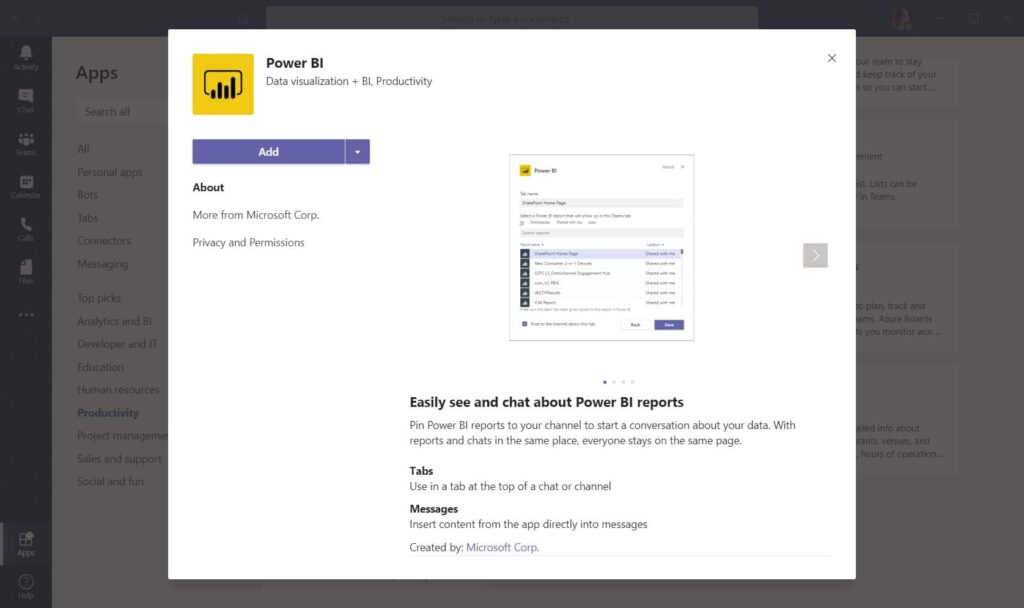
Sure, Microsoft Teams has a lot of magnificent communication tools built right in. But why should that mean you have to say goodbye to the other tools that you already know and love? Good news, it doesn’t. Microsoft Teams easily connects to a wide variety of other web apps. That way, you can use other tools without moving from one app to another. For example, if you use Power BI for creating reports, adding the Power BI app gives your team the capability to view and chat about reports without leaving Teams. All you have to do is:
- Click the “apps” icon at the bottom of your Teams menu.
- You’ll see a catalog with tons of choices. To narrow down your list of options, select a category on the left-hand side of the screen or enter a search term in the search bar.
- Once you found the app you would like to connect, click it in the catalog grid.
- A pop-up window will open, telling you more about the app and what you can do with it.
- To connect the app to Teams, click the purple add button at the top left-hand side of the pop-up window.

Microsoft Teams Productivity Enhancing Features #5: Use the Whiteboard for Virtual Brainstorming Sessions
Getting group of people together to brainstorm is one of the major reasons companies still rely on face-to-face meetings. And if you’ve ever tried to have a brainstorming session over a conference call, with no visuals, you know it’s just an exercise in frustration. But the whiteboard feature in Microsoft Teams makes virtual brainstorming sessions possible. Just like you were in the same room, when you use the Microsoft Teams whiteboard, everyone can see exactly what’s being drawn or written on the board in real time and respond to it as if they were sitting right in front of it.
Pro tip: If you do a lot of drawing on the Microsoft whiteboard, you might invest in a small USB tablet. You can find quality options at a variety of retailers without spending a lot of money.
See how Microsoft whiteboard works in this short video
Microsoft Teams Productivity Enhancing Features #6: Make Important Messages Stand out with Enhanced Posts
Need to tell your team something important or have a lot to say and you need to give your text formatting so that they can easily read it? Enhanced posts are what you’ve been searching for. Open up whatever team you would like to post in. At the bottom of the screen you’ll see the text area that says “start a new conversation. Type @ to mention someone.” Underneath this, there are several icons, the first of which looks like an A with a paintbrush or pen next to it. Click this.
The post text area magically expands to reveal a host of new formatting options, very similar to what you might see in a WYSIWYG editor used for blogging or website editing. You can bold text, underline it, highlight it, change text size, add lists, links and more. You can even give your post a subject that will appear in bold larger text, to help it stand out from all the rest.
If you’re looking for a formatting option, that’s not shown in the icons at the top of the post editing area click the last icon in the row (…). Here you will find a drop-down menu with a few additional options. They include:
- Insert table
- Mark as important
- Undo typing
- Repeat typing

Bonus: Get to Know Microsoft Teams Keyboard Shortcuts
Especially when you have a lot of typing to do, it helps save time when you can keep your hands on the keyboard rather than switching between your mouse and keyboard. So, like most other programs, Microsoft Teams offers many keyboard shortcuts users can choose from. Want to see the complete list? Pressing Control +. opens a full list of all the keyboard shortcuts available in Microsoft Teams. A few of my personal favorites are:
- F1 to start a new chat
- Control + E to go to the search bar
- Control + shift + A to accept a video call
- Control + shift + M to toggle mute on and off
- Control +6 to open files

Want even more great Microsoft Teams tips like these? Check out the resources below.
- https://www.zdnet.com/article/microsoft-Teams-master-remote-work-with-these-expert-tips/
- https://techcommunity.microsoft.com/t5/microsoft-Teams-blog/4-tips-for-working-from-home-with-microsoft-Teams/ba-p/1202083
- https://techcommunity.microsoft.com/t5/microsoft-Teams-blog/4-tips-for-working-from-home-with-microsoft-Teams/ba-p/1202083
- https://support.office.com/en-us/article/Microsoft-Whiteboard-Help-d236aef8-fcdf-4b5e-b5d7-7f157461e920
We hope these Microsoft Teams productivity enhancing features help you get up to speed with the software quickly. For more tips and tricks from our experts, check out our past Office 365 blog posts and follow us on LinkedIn and Twitter.


