Today, in the spirit of the new year, I thought I would update one of our most popular blog posts of all time, “Five Tips and Tricks to Make Using the New Microsoft Outlook 2016 Easier.” Although published in 2017, this blog continues to be one of our readers’ favorites, if you haven’t yet looked at it, you should. The Outlook tips it offers are just as useful now as they were then.
Now, onto our new Outlook tips for 2019. Here’s a list of the topics we will be cover with a link to the corresponding section in the blog. That way, if you’re just interested in a single tip and prefer not to read the whole post, you can jump right to it.
- Send links to documents for easier collaboration
- Stay on top of tasks with a To Do list
- Make Your messages stand out with @Mentions
- Proofread faster with Read Aloud
- Tame your inbox with folders
Outlook Tips for 2019 #1: Cut Down on Inbox Clutter and Confusion, Send a Link Instead
If you’re like most, you probably collaborate with others on a variety of projects. Often, one of the hardest parts of working as a team is keeping track of which version of the document is the current one. I used to search through conversation streams, opening multiple versions of the document and comparing them trying to figure out which one was the newest. Doing this is not only frustrating but can also be a real productivity drain.
The good news is you can avoid this by emailing email links to documents instead of copies. This way, everyone is always working from the same version, and you can see changes in real time. The trick is, if you know you will collaborate on a document, save it to OneDrive instead of your local documents folder.
Not sure how to save a document to OneDrive? It’s easy. In Word, click the file tab, then “Save As.” this will open a menu that looks like the one below. At the top, under “Recent” you should see an option for OneDrive— [your organization name]. If you haven‘t already connected Microsoft Word to OneDrive, you can connect it on this screen.
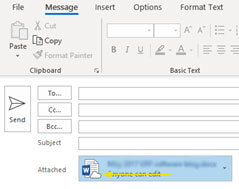

Don’t see a cloud on the attachment icon? No worries. That just means you haven’t uploaded the file to OneDrive yet. You can fix this without leaving Outlook. Click on the arrow to the right of the attached file’s name. A drop-down menu will appear. On that menu, hover over “Upload” then click “OneDrive” your file will now upload and once that’s done, you will see the cloud icon.
Outlook Tips for 2019 #2: Stay on Top of Important Tasks with a To Do List
If you’ve been using Outlook for a while, you probably noticed the little flag icon that appears when you hover over any of the messages in your inbox. Marking a message as a To Do item, is as simple as clicking the flag icon. If you want to set options like due dates or a reminder, right-click the flag icon and a drop-down menu will appear.
But did you know, Outlook gives you the option to view all of your flagged To Do items in one place? If you’re looking for an easy way to create a To Do list for yourself, this is it. Click the … button on the right side of your Outlook window, a drop-down menu will appear. On it, click “Tasks.”
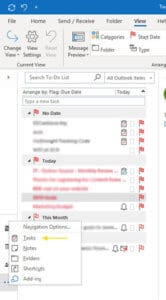
As shown above, the To Do bar pane will open, listing all items you’ve flagged. While in this view, if you want to clear a flagged item off of your To Do list, simply click the red flag icon.
Outlook Tips for 2019 #3: Stand Out in Your Colleagues’ Inboxes With @Mentions
We all get a ton of emails every day, so it’s easy to overlook an important message from time to time. @Mentions is a cool new tool recently added to Outlook that helps key messages stand out. You can use @mentions in emails or meeting requests. To add one, all you have to do is type @ followed by a person’s first and last name. Select the name and Outlook will add it in the to line of the email and highlight it in the body. Finish composing your email and send it as usual. Once the recipient gets your email, they will see an @symbol to the right of the message’s subject line.
Filtering your email by @mentions is an easy way to focus on the messages that need your attention. To do this, go to the top of your messages list, above it, you will see a drop-down menu next to the search box. In this drop-down menu, select “all Outlook items.”
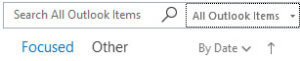
Then, choose “Mentioned Mail.” Now, you’ll only see the messages that mention you by name.
Outlook Tips for 2019 #4: Proofreading Just Got A Lot Easier with the Read Aloud Feature
I don’t know about you, but sometimes to catch small typos or grammar issues in my emails and documents I need to read them aloud. Now, Microsoft Outlook and Word will do that for you. Using this feature in Outlook is as easy as clicking the Review tab, then the “Read Aloud” button in the speech section of the ribbon.

Want to have the mail you get from other people read aloud too? Just select the message in your inbox, then click the “Read Aloud” button in the speech section of the ribbon.
Outlook Tips for 2019 #5: Tame Your Inbox with Folders
Thanks to the sheer volume of emails most of us receive each day, locating one important message can be like finding a needle in a haystack. It’s not only frustrating but can also leave you wasting a lot of valuable time. Folders are great way to group similar messages together. For instance, you might create a folder for each of your projects, to save good ideas, or to collect all the messages you receive from a certain person or team. The choice is yours. You can create as many folders as you like to organize your email in a way that makes sense to you.
To create a new folder, look for the “Inbox” link on the left side of your Outlook window. Right-click it. A drop-down menu will appear. On it, click “New Folder.” Then, give your folder a descriptive name, so you can see at a glance what it contains.
Once you’ve created your folder, you’ll probably want to move messages into it. To do this, all you have to do is drag an email from your messages list and drop it over the folder. Adding multiple messages at once is just as easy. Hold down the control key to select more than one message, then drag them over to the folder just like you did before.
Each of your folders should show up underneath your inbox in the left-hand navigation pane of your Outlook window. If one or more of them is missing, click the triangle next to inbox on the left-hand navigation pane of Outlook to expand the list.
There you have it, five new time-saving Outlook tips for 2019. Want more tips and tricks like these? Check out these other articles on the web.