No matter what position you’re in, if you have an office job, chances are you use Microsoft Word at least a couple times a week, if not every day. So, if you’re looking for ways to boost your productivity, sharpening your Microsoft Word skills is a natural place to begin. Today I will share with you five of my favorite Microsoft Word tips I think will help save you a great deal of time and effort.
Below is a list of the Word tips and tricks included in this blog. If there’s one in particular that interests you, just click the link and you can jump right to it.
- Breakdown Language Barriers with the Translate Text Tool
- Give Your Document a Whole New Look with One Click
- Remove Formatting in Flash
- The Easiest Way to Highlight and Delete Chunks of Text
- Find and Replace, Not Just for Fixing Typos
Word Tips #1: Breakdown Language Barriers with the Translate Text Tool
Whether you work for a large multinational company with offices around the world, or you want to chat easily with your pen pal on the other side of the globe, Microsoft Word’s translate text tool can help you get your message across.
To use it, select the text you wish to translate, right-click it, and on the menu that appears, select “Translate.” The program will automatically detect what language you wrote the document in. Then, a translator dialog box will open on the right-hand side of the screen. Here, if needed, you can adjust the language from which you would like to translate and select the language you’d like to translate to. There’s an impressive list of over 60 choices.
Note: the first time you use the Translate tool, you may see a popup message asking if you want to enable Microsoft Intelligent Services. Click “Turn On” and the translator dialogue box will open.
Word Tips #2: Remove Formatting in a Flash
Sometimes, you might want to give an old document a new look. Or, you might combine portions of several documents to create a new one and their mismatched styles make the file look like something out of Dr. Frankenstein’s lab. Once upon a time, cleaning up all this formatting was a very tedious task, but not anymore. Newer versions of Microsoft Word have a handy button on the “Home” tab of the ribbon you can use to remove all a document’s formatting in a single click. All you have to do is highlight the areas where you would like to remove the formatting, then click the A with the purple eraser next to it.
Working with an older version of Word? Fear not. You can still quickly remove a document’s formatting. Just highlight the text, then press Ctrl + Spacebar.

Word Tips #3: Give Your Document a Whole New Look with One Click
Anyone who has used Word as a desktop publishing tool to create brochures, flyers, etc., knows creating a visually pleasing color and font scheme can be difficult. However, newer versions of Microsoft Word have a tool to make this much easier, “Themes.” Frequent users of PowerPoint are probably familiar with the “Theme” tool in that program which allows you to give your slides a cohesive design fast. The “Theme” tool in Microsoft Word works much the same way.
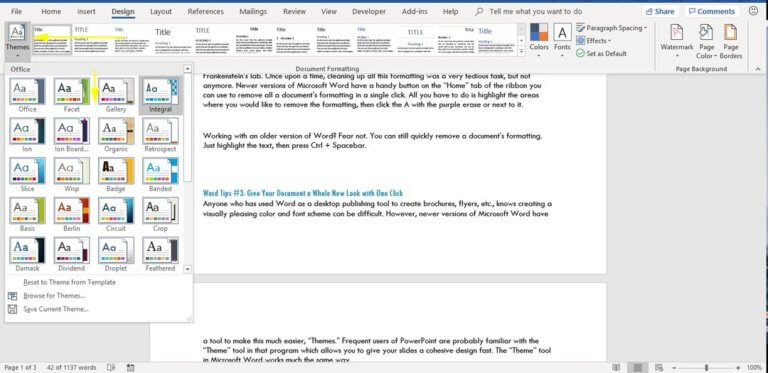
To apply a theme to your document, choose the “Design” tab on the ribbon, and click the “Themes” button. This will open a drop-down menu with an array of themes for you to choose from. Not sure which one you want to use? Simply mouse over the different choices and you’ll see them previewed in your document. Once you find the one you like, click it and it to apply it to your entire document.
Want to make a theme match your company’s brand or add your own spin to it? Customizing the out of the box themes available in Microsoft Word is easy. Use the tools in your ribbon’s “Theme” menu to adjust the theme. You can change the fonts, colors and styles used in a theme to make it your own.
Word Tips #4: Highlighting and Deleting Chunks of Text—the Easy Way
When you need to remove large chunks of text from your document clicking and dragging to highlight the exact text you want to remove or pecking at your keyboard’s backspace button can feel like a tedious waste of time. Good news! Here are two ways to make that task much easier.
Option one, hold the Ctrl key and click any word. This will highlight the entire sentence around the word in. Then, press backspace or delete once and it removes the whole sentence. Option two, press the Ctrl key, + backspace. Instead of deleting one letter at a time, you will now delete one word at a time.
Word Tips #5: Find and Replace – Not Just for Fixing Typos
If you’ve been using Word for some time now, I’m sure you’re aware of the Find and Replace tool. But, did you know you could use it for more than just replacing one word or string of words with another? Find and Replace is also useful if you want to swap out every image in a document or replace/remove special or invisible characters.
How to Replace Images
Add a copy of your new image to Word’s clipboard (i.e., Open the image in Word, highlight it and press control + C). Then, open the “Find and Replace” menu. You can either click it in the ribbon or press Ctrl + H. Once the Find and Replace dialog box is open, type “^g” (which means, “all graphics”) in the “Find” box and type “^c” (which stands for, “the clipboard contents”) in the “Replace” box. Finally, click “Replace All.”
How to Replace Special and Invisible Characters
Sometimes, when you’re working on a long document, formatting can get a bit out of hand. You might wind up with extra spaces where you don’t want them. This is the quickest way to remove those. For example, let’s say you want to remove all double spaces and replace them with a single space. To do this, open the “Find and Replace” menu. In the “Find” box, enter,”^p^p”(“^p” denotes a hard return). And, in the replace box, type “^p”and click “Replace All.” For other lesser known uses of “Find and Replace,” look at this article.
Hopefully, you’ve learned something new to help you save time and effort when working in Microsoft Word. If you have a favorite Word tip or trick, you would like to share, please leave it for us in the comments below.